5/29/2015

Back from the alignment - Initial Thoughts

  After getting Helena back from the kind hand at Bolton James, the difference in handling was immediately noticed. Upon changing lanes I used to have to wrench on the wheel a good bit. The car sort of lumbered over there. Now turn in is crisp and sweet. It goes immediately, smoothly. Woah!

  The lean in while cornering is significantly improved. The front end used to feel like it was lifting a tire when I would go around any 90’ corners. Now it feels firm and planted. The rear feels incredibly stabile in comparison. I mean let’s face it though; I only changed out the shocks and mounts here. However, the rear end of the car looks like it was at least somewhat maintained. Bushings are not shot and failing. A few cracks per Eric but, nothing major. I got the same story from Bolton James.

  Since I am turning into an old man, the suspension does certainly feel somewhat stiffer. Now, I’m not talking rough civic hatch with hard springs stiff, just subtly more so. You can hear the bumps, if they are big enough, work through the suspension now. The car is controlled but, rebounds a bit more. This is a blemished comparison because the suspension was shot before. In comparison to how the ride was, soft and slushy, it is now a good amount of firm. It will just take some getting used to.

  The front end does still seem to lumber slightly. As it was designed I’m sure. This is a larger heavier vehicle, with a larger heavy engine up front. All of my comparisons come from a 90 hatch with tight suspension which, is really a bad comparison as well. The hatch is like a go-cart. Nothing I ever own moving forward will be as light or nimble as that, in my mind anyway.

  I’m not complaining about that fact either. I love the way BMW has designed the suspension. It is gentle yet sporty. I think it is the best balance of both. With big nice comfy leather recliners in there, it makes for a fun long distance cruiser as well.


5/28/2015

E36 Suspension Upgrade Part 1 (Rear) - M3 Bilstein Sports and H&Rs - Helena get's her suspension on

  The day has finally come to restore and correct the years of wear on Helena's poor, tired suspension. The quest for improvement has finally come. The mountain has been climbed, and with the help of the master parts provider, we are on our way to install the ring of suspensiony goodness. Crazy mystical story over, let's get to it.

  With the help of a few eager gentlemen, we got to work setting things right.

  Jeremy also being an E36 wrangler for many years took up the work on the front end. Eagerly jacking the car up even before I made it to the garage. The wheels were off in a flash. The sweet sounds of a Lithium Ion Powered impact wrench at work.

   In lieu of Jeremy working the front end, we started in the rear.

Getting the carpet out of the rear of the car requires a few steps but, nothing major.
  • Remove the light assembly covers.
  • Take out the left hand plastic floor cover. Two 10mm nuts.
  • Twist off the back seat carpet holding nuts.
  • Both rear speaker pods will need to be removed.
  • Pull out the left hand (driver side) carpeting. It is just resting in place. Its formed to fit so you will have to fiddle with it to get it out. Be gentle.
  • Remove the left hand shock tower sound deadening. Be careful these can be brittle.
  • On the right hand side (passenger) there is a clip that holds the power cable for the battery. Pop this off.
  • The right hand carpeting has the release for the gas tank attached to it. We did not discover a solid way to remove this from the carpeting without breaking it or cutting the carpet. We just held the carpet out of the way. If anyone has a preferred method for such let me know please.
  • There is a metal cover over the battery cable. There are two 10mm nuts on this one as well.
  • Pull out the right hand side sound deadening.
  • At this point the trunk should be barren and both shock mounts should be accessible. 


  Eric and Brandon were kind enough to work it all out and let me stop them to snap pictures. 

  Since I was only doing shocks and shock mounts this time around, it made this part of the project pretty simple. Pull off the old stuff, put in the new.


Rear tools of the trade:

  16mm socket - Shock piston to shock mount
  19mm socket - lower shock bolt
  13mm socket - shock mount to body nuts

    Removal of the rear shock
  • Remove the bottom 19mm bolt that secure the shock to the lower control arm.
  • Remove the two 13mm bolts on the shock mount.
That's it. The shock should come out with little effort.


  The springs have a top and bottom dampening pad on them. There is an
up and down. Don't get them confused, as we did, or they won't go back in properly. H&R specifies that unless otherwise noted, the closer coils face up.

Painted H&Rs in place

  If you have a friend with strong legs you can in fact get the springs out once the
rear shock is removed. This car of course has stock rear everything so your results
may vary there.

  The rear "dust" covers on the stock rear shocks were not attached to anything. I'm unclear what they were doing aside from just hanging on the shock. From what I can tell they are supposed to be suspended from the rear shock bump stops to keep debris off the shock piston. One side had a broken one the other didn't. The poor rear end must have been bouncing off of them for a while now.

  I just took them off because with the new rear mounts and the Bilsteins, they were just resting on the top of the shock. I put some new bump stops on order. I also forgot the rear shock reinforcement plates. Those are on order as well.


  We zipped off the old mounts with an impact. The stock shocks do allow for a wrench to be placed on the top to hold the shock piston as well. The impact seems to be an easier, faster go of things.


Reassembly requires:
  •  Putting the shock mounts and washers in the correct order. 
  •  Put on  your bump stops and shock cover, if you have them.
  We found that mounting them to the body first then, putting in the bottom bolt was easier for us. As long as the suspension is back together at the end of the day though, it doesn't really matter. Torque specs from the Bentley Manual for reference below. If you don't have one buy one: Buy a Bentley*


  I'm using M3 H&R Springs for this project the H&R technical guide specifies that you need to trim the stock rear bump stop 3/4 of an inch. Since I forgot to purchase those at this time I'll follow up on this post once I get to that point.
*I'm in no way affiliated with Pelican Parts. Just wanted to give a link in case someone wanted the reference. I like their site layout for parts and references. Bentley Manuals can be bought anywhere online.
5/21/2015

1978-1987 BMW 633CSi,733i 528e 735i AC Condenser Relay Testing

  Let me preface this post by saying that I'm no electrical guru. I'm an IT Analyst with an interest in electronics. Enough interest to want to learn and discover more about how and why things work the way they do.

  In lue of that, today finds me checking out some relays for PartsEuropean.com. Good people over there. This all spawned from some supposedly bad relays that were reported by an eBay buyer. Time to pull out the ole multi-meter and have a gander.


  We are working on an 1978-1987 BMW 633CSi,733i 528e 735i AC condenser relay specifically. There was some talk of these not being in proper working order. Let's give this thing a once over and see if we can find out.

  Trying to cross reference part numbers for these guys is hard. Even realoem.com's site seemed to turn up empty. It needs a 7 or an 11 digit number. All the numbers on this thing are neither. Hmm...
  Testing resistance across the terminals lead me to these conclusions on two separate multimeters:
  I tested three of them to almost exactly identical specs, within 0.3k. 

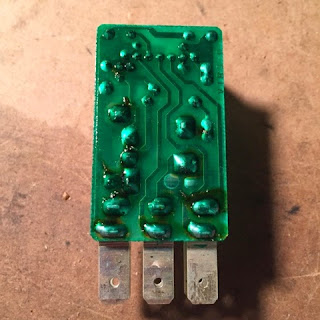
  The relay actually has a mechanical relay inside. That giant copper colored piece has a switch that is moved when the relay is triggered. 

  Here we can see the actual relay switch contact.


  The micro chip inside the relay. It has 7 terminals on the bottom. 

  There are several components on this board. Here is what I can make of them. Those two at the top right actually turned out to be diodes. The resistance on the 180K resistor checks out. This is between pins 6 and 3.

  I found a diagram from an aftermarket unit that looks like this. Here is my crude diagram of such.

  I can vouch for Pins 4 and 5, they do in fact change when the relay is triggered.

  Based on all that I can make out of this, there is no reason to think that this relay is no functional. If someone else out there has more information on this please comment. I'm always happy to learn more. Two heads are better than one in many cases! 

5/14/2015

The search for the great suspension - Part 3 - The final pieces

E36 Suspension Upgrade - Bilstein w/H&R

  Since the last posting I've finally been able to get the last of the pieces for Helena's tired suspension. I was hoping to not have to replace the strut mounts on the used front Bilstiens however, I have no idea how many miles are on them, they are missing screws, and the rubber is starting to separate from the mount. Even one of these would be justification to change that bad boy.

  Here is the roughly finished listing below. I wanted to get 96+ M3 front strut mounts but, I'd like to see how these feel on the daily. Next change out perhaps I'll go for the M3 mounts. I'd like to see if I personally, can feel or notice a difference in the handling during normally driven duties.


  This will be round one to take care of that sweet floating feeling and get this BMW handling like well, a BMW. Its always good to have a few friends that can hang out and assist as well.

  For the front end: I call this performance restoration level 1.5. There are several pieces from the master list that I'm missing to make it a full level 2 in my mind. I'm not changing the sway bar links or the tie rods this go around.
  • 2 front control arms - check 
  • 2 control arm bushings with brackets - check 
  • 2 sway bar end links - nope! 
  • 2 tie rod assemblies - nope! 
  • 2 strut mounts - check 
  • 2 strut mount reinforcement plates - check
  In the rear I'm not doing anything except the shock mounts, springs, and shocks. 
  • 2 rear shock mounts - check
  • 2 rear shock mount reinforcement plates - nope!
  • 2 rear upper control arm bushings - nope! 
  • 2 camber arm bushings - nope! 
  • 4 rear upper and lower trailing arm ball joint upgrade - nope! 
  • 1 differential bushing - nope! 
  • 4 rear subframe bushings - nope! 
  • 2 trailing arm bushings - nope! 
  • 4 RTAB limiters - nope!
  Why not anymore on the rear? I ran out of cash flow. Plus, if I did it all at once what fun would that be? Gotta have some more projects to look forward to you know? We will investigate what else may be next on the list after we have given things a once over. This will be the second time I've been under the car since ownership.  

5/01/2015

Strut prep and paint - Let's make em' hot again

  Since I bought the front struts and springs used, from up north, I knew they would need a little clean up and some rust removal. Not a big issue for me as these things tend to hold up better than folks expect.

  I started off by cleaning the struts thoroughly. Some degreaser, sweat, and brake cleaner later they were better.

  Once I got most of the grim off it was time to take care of the tough spots. I pulled out my bottle of rust arrester from the hatchback days (technically its still around though). I lathered them nicely in this and let them fizzle. Please be careful with that stuff folks. Its really nasty. After letting them sit over night, it was time for the good stuff.
  I used a wire brush to break up some of the cracked and peeling powder coat. Then used some 220 grit sandpaper to rough em up just a bit.

  Laid down 2 coats of primer.

  I started to sand them again with 400 grit but, they were smooth enough for me so I went ahead and put down some "almost-bilstein-yellow" paint back on them.

Time to let them dry. I shot over the yellow with a little lime green as well. Just for fun. I had some ideas for some more color however, I'm running short on time. I still need to lay some clear coat on these.

  Since rear springs also had a little rust on them I went ahead and rust arrested them as well. After which I primed them and then, shot them with a light coat of under coating.

Materials


Before
After
  I dare say they turned out great. Of course you can't see the pretty writing that says they are H&Rs anymore. Sad for all those folks who want to climb under my car and inspect them. This undercoating holds up pretty well but, it isn't as good as the molded poly shielding around the H&Rs. We will see how these do long term.