The day has finally come to restore and correct the years of wear on Helena's poor, tired suspension. The quest for improvement has finally come. The mountain has been climbed, and with the help of the master parts provider, we are on our way to install the ring of suspensiony goodness. Crazy mystical story over, let's get to it.
With the help of a few eager gentlemen, we got to work setting things right.
Jeremy also being an E36 wrangler for many years took up the work on the front end. Eagerly jacking the car up even before I made it to the garage. The wheels were off in a flash. The sweet sounds of a Lithium Ion Powered impact wrench at work.
In lieu of Jeremy working the front end, we started in the rear.
Getting the carpet out of the rear of the car requires a few steps but, nothing major.
- Remove the light assembly covers.
- Take out the left hand plastic floor cover. Two 10mm nuts.
- Twist off the back seat carpet holding nuts.
- Both rear speaker pods will need to be removed.
- Pull out the left hand (driver side) carpeting. It is just resting in place. Its formed to fit so you will have to fiddle with it to get it out. Be gentle.
- Remove the left hand shock tower sound deadening. Be careful these can be brittle.
- On the right hand side (passenger) there is a clip that holds the power cable for the battery. Pop this off.
- The right hand carpeting has the release for the gas tank attached to it. We did not discover a solid way to remove this from the carpeting without breaking it or cutting the carpet. We just held the carpet out of the way. If anyone has a preferred method for such let me know please.
- There is a metal cover over the battery cable. There are two 10mm nuts on this one as well.
- Pull out the right hand side sound deadening.
- At this point the trunk should be barren and both shock mounts should be accessible.


Eric and Brandon were kind enough to work it all out and let me stop them to snap pictures.
Since I was only doing shocks and shock mounts this time around, it made this part of the project pretty simple. Pull off the old stuff, put in the new.

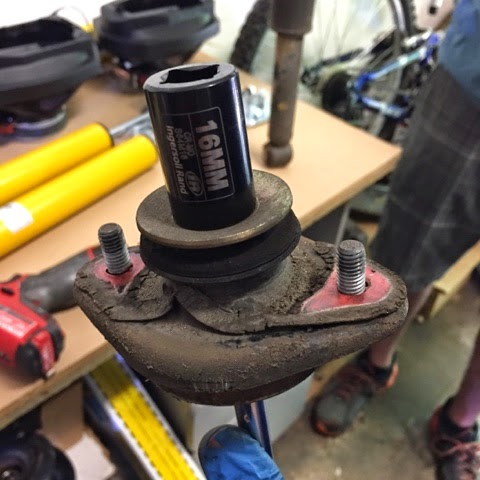
16mm socket - Shock piston to shock mount
19mm socket - lower shock bolt
13mm socket - shock mount to body nuts
Removal of the rear shock
- Remove the bottom 19mm bolt that secure the shock to the lower control arm.
- Remove the two 13mm bolts on the shock mount.
That's it. The shock should come out with little effort.


The springs have a top and bottom dampening pad on them. There is an
up and down. Don't get them confused, as we did, or they won't go back in properly. H&R specifies that unless otherwise noted, the closer coils face up.
 |
| Painted H&Rs in place |
rear shock is removed. This car of course has stock rear everything so your results
may vary there.
The rear "dust" covers on the stock rear shocks were not attached to anything. I'm unclear what they were doing aside from just hanging on the shock. From what I can tell they are supposed to be suspended from the rear shock bump stops to keep debris off the shock piston. One side had a broken one the other didn't. The poor rear end must have been bouncing off of them for a while now.
I just took them off because with the new rear mounts and the Bilsteins, they were just resting on the top of the shock. I put some new bump stops on order. I also forgot the rear shock reinforcement plates. Those are on order as well.


We zipped off the old mounts with an impact. The stock shocks do allow for a wrench to be placed on the top to hold the shock piston as well. The impact seems to be an easier, faster go of things.
Reassembly requires:
- Putting the shock mounts and washers in the correct order.
- Put on your bump stops and shock cover, if you have them.
We found that mounting them to the body first then, putting in the bottom bolt was easier for us. As long as the suspension is back together at the end of the day though, it doesn't really matter. Torque specs from the Bentley Manual for reference below. If you don't have one buy one: Buy a Bentley*

I'm using M3 H&R Springs for this project the H&R technical guide specifies that you need to trim the stock rear bump stop 3/4 of an inch. Since I forgot to purchase those at this time I'll follow up on this post once I get to that point.
*I'm in no way affiliated with Pelican Parts. Just wanted to give a link in case someone wanted the reference. I like their site layout for parts and references. Bentley Manuals can be bought anywhere online.
No comments:
Post a Comment