Specs
Rotors
Why would you try putting these on an E36? I'll tell you. The E46(99-05) 325 & 328 have 11.8 inch rotors up front. The stock e36 rotors on my car are 11.2. I'm gaining about a .6 inches. Not much but, it is an improvement in rotor circumference.
The calipers are identical, the pads the same, it's the carrier bracket that differs. These will increase my radial braking surface resulting in a whopping 6% braking increase over the front axel! Can you even believe it? A laugh and giggle there for sure, obviously. However, all be it a small increase upgrading to E46 rotors and calipers all around, with stock pads, will accumulate around a 13% increase total which, is something.
 |
| 11.8 inches on the E46 325, 328 rotors |
Calipers
I was curious about the sizing of the piston diameter on my stock E36 calipers versus the stock E46 calipers. Some pictures for confirming sizes of the piston diameter below.
- The serial numbers on the calipers differed slightly.
- The weight was about the same.
- The piston diameter was also the same.
 |
| 2.085 outer roughly. |
 |
| 1.565 inner roughly. |
 |
| .250 (1.4) thickness. |
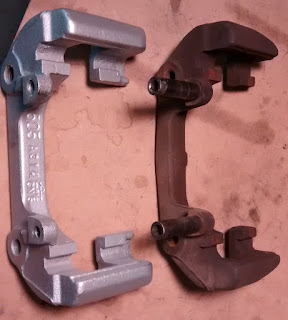
The bracket was certainly different. It moves the caliper out further from the spindle to accomdate the larger rotor. The slide pins are in the exact same location allowing for use of an E36(325, 328) or E46(325, 328) caliper.
 |
| Caliper brackets side by side. Its hard to see the spacing of the threaded holes at this angle. Sorry. They are just a bit more than a 1/2 inch different. |
Prep and Paint
Of course before I put these on my ride Id like to make them, not red. A good spray down with brake cleaner. Some medium grit(220) sandpaper to get started. I used the rotary tool to get in the tight spaces. This creates a good bit of dust, please be cautious and wear a face mask here. If I had a media blast cabinet, that would have made this a dream. Its on my list.
Tools of the trade for prep
- Heavy wire brush
- Large pliers
- Rotary Tool with a metal brush on it
- 120 Grit Sandpaper
- 220 Grit Sandpaper
- Brake Cleaner
- Not sure what I was doing with the wheel cleaner there
 After sanding and a rinse. They are ready for paint. I'd advise removing the carrier pins. This can be done with a 7mm Allen wrench or socket.
They look so good after a good spray. Unfortunately as with most spray paint techniques, these may not hold their color forever. We will see. A lot of people really have great success with powder coating however, the cost is substantially more. I do not have that kind of cash flow for this project.


