Labels

Showing posts with label Info. Show all posts

1/17/2016

The Breakdown - Coolant System Woes - Part 2 - Ken Baker Originals


So Ken Baker Originals (Europro) went to work to get things straightened out for me. They experienced there own troubles with Helena as it would seem as well. When they pressurized the system all seemed fine. This was good news. The next day the hose blew off again. This is when they discovered that the radiator inlet was broken. One of the rings of the inlet broke off when it overheated in the drive thru. I had forgotten all about this. I was stressed. Mark who is the Parts Manager there, took it all in stride. He was a calm professional and assured me it would be taken care of.

There was no safe way to reattach that hose. It was time to put in a new radiator. This was Wednesday. Is there an option for a radiator overnight? Mark called me back around 6:30 PM that evening and said that in fact he could get a radiator. It was an all aluminum CSF radiator. A decent all aluminum replacement and, his cost for this was less than a factory plastic one. A win, win!

Now things in Myrtle Beach run differently. When I hear overnight shipping, I'm thinking 2PM drop off at the latest. Normal stuff. However due to their being no straight route in it seems that sometimes this is not the case. The radiator didn't show up until after 3PM. I had to pick up the car because we were leaving the next morning. Talk about stress. Jeez, it was almost unbearable for me.

I called the shop to see how they were looking around 3PM. Kayla is the Parts Assistant answered the call. She went to find out what was up. She told me they had just got the radiator and were putting it in now. She said to expect it withing the hour. Glory hallelujah! The clouds parted, the storm calmed. It was the home stretch now. Paul ran me up there shortly after.


Upon arriving I see many Euros outside, a clean lot, and a clean shop. The boys were playing techno in the shop and getting work done. My kind of place. I met Mark and he took my out to me the BMW guru who was taking care of Helena. He was a very nice, down to earth, and polite gentleman as well. I probably sounded like a stupid kid talking to him but, I was so excited to see the car in a more functional state.


As we were talking the guru told me that he tried to get the fan switch out of the side of the radiator and with light pressure the whole side of the radiator broke off. The fan switch was stuck in the brass insert that was molded into the plastic end tank. I now have this as a memento. As well as a good reminded to be timely about maintenance of this car.

Needless to say, Europro pulled through wonderfully for me. They had a full shop and a lot full of cars to work on but, they still made time for my car, took time to have a conversation with me, and were not judgmental. They are a good group of folks over there. I was glad to have the chance to work with them, despite the less than fantastic reason for being there.


When the beans came down to be paid, Mark done me fairly. They advertise 30% less than the dealer. This is true. Parts costs are a little higher than what I'm used but, they have to eat too. By no means were they outrageous. Would you not spend a bit more to keep your BMW going? Then, to have those parts installed by Bosch certified technicians. I appreciate their work. If I ever find myself in need in the Myrtle Beach area, they are who I would go see next time.


Issue #1 - Car was getting hot and blew off the upper radiator hose.
Issue #2 - The system was pressurized then, blew off the hose again.
Issue #3 - No radiator fan or fan clutch. See starting coolant overhaul post.
Issue #4 - The plastic was broken off the upper radiator hose inlet.

11/25/2015

Coolant System Overhaul Preparations

Helena tried to over heat the other day while stuck in a drive-thru. I'm sitting there one minute, I'm looking at the needle rise the next. As it would seem when I opened up the heat, the system was improperly bleed. This lead to a big ole air pocket getting stuck in the system. These models are exceptionally effected by having air in the system.

Upon further research I discovered that the system is pressurized up to 2 bar (29PSI). The Bahr overflow tanks can explode under such pressures. Albeit rare, sometimes they do. I'm wondering if there is a benefit to such pressure. The higher the pressure the higher the temp of the coolant before it starts to boil. Most vehicles run between 15 and 18 PSI. There is one company German Auto Solutions, providing overflow tank caps that put the system at 1.2 bar (17psi). BMW seems to have understood this as well. Newer models come with a lower pressure rating now. I'm interested in this. More later.

Helena has a mechanical fan fan clutch. These can also fail over time. Sometimes they stop spinning altogether. Other times they lock up and do not variate with engine speed. This leads to the fan exploding. Note: This statement may be a myth. Per better sources: Most people do not replace their serpentine belt tensioner and the belt lets loose, that then in turn causes the fan to fail. I've also heard of cheap replacement fans throwing their blades at higher RPMs.

When the fan fails the radiator, overflow tank, hoses, pulleys, belts, and thermostat can be adversely affected by flying pieces of broken components. The pulleys are also made of plastic. The radiator fan is, of course, made of plastic as well. There are euro counter parts available that have a plastic ring surrounding the blades. This helps with this issue. Giving the blades a bit more rigidity. If this fan was to explode it would cost quite a bit more than the stock fan and clutch, that's for sure.

She also has an auxiliary fan mounted in front of the radiator. This is operated by a aux fan switch that should come on when the coolant reaches 91°-99° C. This fan also comes on and off when the A/C is running. So in essence the radiator has a fan that pushes air from the front (aux fan) and pulls air from behind (mechanical fan).

I was told when I bought it that some work had been done to the coolant system. No paper records but, there is an aluminum thermostat housing on this car. That means it had been replaced from the plastic composite one that would be there normally. It has 05/15 etched in to it. The hoses appear to be newer as well. I'm guessing they were changed at the same time. Or at least not swollen and nasty. 

This is good and bad because I have no idea about any of the other pieces in the system. Has the water pump been changed? How old is everything else? This 328 has 160K on the clock. Just a matter of time before stuff goes wrong if I don't do some preventive maintenance.

Which is what has lead me to where I am now. For my piece of mind, I need to know that the coolant system is in good order. So, off to the parts websites to order what I think I need.

Here is the lot of stuff I got:


- Coolant Overflow Tank (BMW)
- Coolant Level Sensor (FEBI)
- Upper Radiator Hose (GATES)
- 92`C Thermostat (BEHR)
- Water Pump (GRAF)
- Water Pump Pulley (ECS)
- Water Pump Nut (BMW)
- 80/88 Aux fan Switch (URO)

What I already had

- Aluminum Thermostat Housing
- Fan Clutch
- Fan
- Belt
- Lower Hose looked good.
- Overflow to Heater core hose looked good.
- Upper Overflow hose looked good.
- Radiator looks like it has been replaced as well.


  The folks who did the coolant system changes before didn't do half bad a job. This car has obviously had green coolant run in it for quite some time. my overflow looks like a ninja turtle.


  The original issue of overheating was taken care of by bleeding off the system properly. Which thanks to my friend Jeremy, is made a lot easier by jacking up the front of the car. Following the standard BMW coolant change procedure, when jacked up in such a fashion, the air bubbles rise up front faster and easier. Nice!

  Well if the car isn't overheating anymore why buy stuff? While working out the overheating and checking the other components of the system, I discovered that the fan came in contact with the upper radiator hose at some time. There was a small divot taken out of the hose down to the braiding. This made me nervous. If I am going to take the hose off then, I might as well replace some of the other components as well. 

  Again, I need piece of mind in regards to the age of the components. Preventive maintenance, mixed with a little performance maintenance. More to come on that.

10/27/2015

E36 Intermittent Starter Issue - Starter Motor Research

My Starter has started to intermittently stopped functioning. What I mean by that is when I turn the key to start the car sometimes the starter will begin to engage then, just stop. The engine hasn't had enough time to turn over, in turns it doesn't start. Time to plan a replacement procedure.

Most of the auto parts stores have a China made replacement for around $125 without core charge. Advanced Auto actually has a Bosch for a good bit more. However, they are also running a 20% off special, for online orders only, and free shipping. This brings the price down to non discounted China made starter levels. I personally prefer the Bosch starter simply for the fact that I do not want to make it a habit of taking off the manifold and replacing my starter, period. The parts probably all come from the same place these days anyway but, peace of mind knowing it is a genuine Bosch piece.


I've also been looking at the difference in the starters themselves. It would seem that the original factory starter on early e36 models (per 96) had weaker mounting ears, a bracket that affixes them to the engine, and non threaded holes. All of these things from what I can tell make changing the starter a real pain. Here is a picture of such: http://s82.photobucket.com/user/Dispatch20/media/starter.jpg.html
 
I found a great video online showing what a disassembled starter looks like as well: https://www.youtube.com/watch?v=PdNQuPS0U6w
 
I've yet to tear in to anything. I'm simply researching what I'll looking at getting in to. More to come on this subject, most certainly.

6/11/2015

Fresher rear badge for Helena - Differences between e36 and e46 rear badges

  When removing the rear badge off your hot whip be careful using any metal object. If your an impatient goober like myself then, you will scratch your paint. Not that anyone else can see it after the new roundel is on but, you know its there.

  A good set of plastic/poly interior removal tools proves very valuable here. Most of the issues I've heard and seen with badges are from the plastic grommets on the trunk side cracking. This makes for an insecure fit on the new roundel. 

Differences between E46 badges and E36 badges  

  BMW stock part number on e36 front/rear badge: 8 132 375 
  Size Front and Rear: 82mm

  Part number on e46 badge: 
  Front: 8 132 375   Size Front: 82mm
  Rear:  8 219 337   Size Rear: 73mm

  Applies to the rear roundel only: As you can see the e46 badge (on right) is slightly smaller.
  
Removing the rear badge

 What worked for me. I started using a plastic spatula to get mine off the rear. However, the edge wasn't slim enough to get under it. I then, used a small screw driver that I wrapped in a paper towel. Not a smart Idea. I might as well have just used the screw driver. 

One I got it started by applying light pressure to the left and right sides of the roundel. When it started to lift,  I rocked it gently going from one side to the other. It then, started to shimmy itself out properly. Don't be too rough on it or you will crack those grommets. Once off, clean up the filth under it. Check your grommets, replace as necessary. Then, pop on your new roundel and enjoy.


5/29/2015

Back from the alignment - Initial Thoughts

  After getting Helena back from the kind hand at Bolton James, the difference in handling was immediately noticed. Upon changing lanes I used to have to wrench on the wheel a good bit. The car sort of lumbered over there. Now turn in is crisp and sweet. It goes immediately, smoothly. Woah!

  The lean in while cornering is significantly improved. The front end used to feel like it was lifting a tire when I would go around any 90’ corners. Now it feels firm and planted. The rear feels incredibly stabile in comparison. I mean let’s face it though; I only changed out the shocks and mounts here. However, the rear end of the car looks like it was at least somewhat maintained. Bushings are not shot and failing. A few cracks per Eric but, nothing major. I got the same story from Bolton James.

  Since I am turning into an old man, the suspension does certainly feel somewhat stiffer. Now, I’m not talking rough civic hatch with hard springs stiff, just subtly more so. You can hear the bumps, if they are big enough, work through the suspension now. The car is controlled but, rebounds a bit more. This is a blemished comparison because the suspension was shot before. In comparison to how the ride was, soft and slushy, it is now a good amount of firm. It will just take some getting used to.

  The front end does still seem to lumber slightly. As it was designed I’m sure. This is a larger heavier vehicle, with a larger heavy engine up front. All of my comparisons come from a 90 hatch with tight suspension which, is really a bad comparison as well. The hatch is like a go-cart. Nothing I ever own moving forward will be as light or nimble as that, in my mind anyway.

  I’m not complaining about that fact either. I love the way BMW has designed the suspension. It is gentle yet sporty. I think it is the best balance of both. With big nice comfy leather recliners in there, it makes for a fun long distance cruiser as well.


5/21/2015

1978-1987 BMW 633CSi,733i 528e 735i AC Condenser Relay Testing

  Let me preface this post by saying that I'm no electrical guru. I'm an IT Analyst with an interest in electronics. Enough interest to want to learn and discover more about how and why things work the way they do.

  In lue of that, today finds me checking out some relays for PartsEuropean.com. Good people over there. This all spawned from some supposedly bad relays that were reported by an eBay buyer. Time to pull out the ole multi-meter and have a gander.


  We are working on an 1978-1987 BMW 633CSi,733i 528e 735i AC condenser relay specifically. There was some talk of these not being in proper working order. Let's give this thing a once over and see if we can find out.

  Trying to cross reference part numbers for these guys is hard. Even realoem.com's site seemed to turn up empty. It needs a 7 or an 11 digit number. All the numbers on this thing are neither. Hmm...
  Testing resistance across the terminals lead me to these conclusions on two separate multimeters:
  I tested three of them to almost exactly identical specs, within 0.3k. 

  The relay actually has a mechanical relay inside. That giant copper colored piece has a switch that is moved when the relay is triggered. 

  Here we can see the actual relay switch contact.


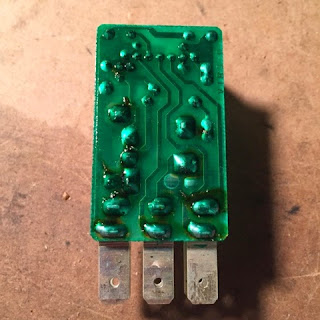
  The micro chip inside the relay. It has 7 terminals on the bottom. 

  There are several components on this board. Here is what I can make of them. Those two at the top right actually turned out to be diodes. The resistance on the 180K resistor checks out. This is between pins 6 and 3.

  I found a diagram from an aftermarket unit that looks like this. Here is my crude diagram of such.

  I can vouch for Pins 4 and 5, they do in fact change when the relay is triggered.

  Based on all that I can make out of this, there is no reason to think that this relay is no functional. If someone else out there has more information on this please comment. I'm always happy to learn more. Two heads are better than one in many cases! 

5/14/2015

The search for the great suspension - Part 3 - The final pieces

E36 Suspension Upgrade - Bilstein w/H&R

  Since the last posting I've finally been able to get the last of the pieces for Helena's tired suspension. I was hoping to not have to replace the strut mounts on the used front Bilstiens however, I have no idea how many miles are on them, they are missing screws, and the rubber is starting to separate from the mount. Even one of these would be justification to change that bad boy.

  Here is the roughly finished listing below. I wanted to get 96+ M3 front strut mounts but, I'd like to see how these feel on the daily. Next change out perhaps I'll go for the M3 mounts. I'd like to see if I personally, can feel or notice a difference in the handling during normally driven duties.


  This will be round one to take care of that sweet floating feeling and get this BMW handling like well, a BMW. Its always good to have a few friends that can hang out and assist as well.

  For the front end: I call this performance restoration level 1.5. There are several pieces from the master list that I'm missing to make it a full level 2 in my mind. I'm not changing the sway bar links or the tie rods this go around.
  • 2 front control arms - check 
  • 2 control arm bushings with brackets - check 
  • 2 sway bar end links - nope! 
  • 2 tie rod assemblies - nope! 
  • 2 strut mounts - check 
  • 2 strut mount reinforcement plates - check
  In the rear I'm not doing anything except the shock mounts, springs, and shocks. 
  • 2 rear shock mounts - check
  • 2 rear shock mount reinforcement plates - nope!
  • 2 rear upper control arm bushings - nope! 
  • 2 camber arm bushings - nope! 
  • 4 rear upper and lower trailing arm ball joint upgrade - nope! 
  • 1 differential bushing - nope! 
  • 4 rear subframe bushings - nope! 
  • 2 trailing arm bushings - nope! 
  • 4 RTAB limiters - nope!
  Why not anymore on the rear? I ran out of cash flow. Plus, if I did it all at once what fun would that be? Gotta have some more projects to look forward to you know? We will investigate what else may be next on the list after we have given things a once over. This will be the second time I've been under the car since ownership.  

3/07/2015

The Search for the Great Suspension - Bilsteins - Part 2

  With the lower control arms and the lollipops taken care of, it was time to find struts. The front passenger side was leaking when I took it for an alignment several months ago. Needless to say the front end has no dampening happening at this time.

  Since this is daily driven, I have no problem replacing the struts with factory pieces. Helena has the Sports Suspension package on it already. Several different sites have struts specifically for this. They range anywhere from $120-$200 per strut from the decent manufacturers (Bilstien, Myle, Sachs, KYB). Some of these feature a 4 year warranty and better than stock performance. Unfortunately I just wasn't familiar enough with them to know which to choose. The OEM BMW struts we $250 a piece. I definitely wasn't  going that route. 

  I just needed to get some struts that would do the job. As I'm a car guy, going stock isn't always the easiest option. The premier strut, spring package for these cars are either the Bilstein Sports Struts with the H&R Sport Springs or the Koni Sports with H&R Sport Springs. There seems to be a huge following for either strut choice. It depends on who you talk to.

  This leads to a whole different conversation. The front end of a stock 328i differs from the M3 just a bit. I'm strictly speaking of the 96-99 M3 here. Key differences:
  • The sway bar end link attaches to the strut itself. This allows for more control as opposed to a control arm mounted link. The M3 also has a lighter, smaller sway bar because of this.
  • The upper strut mount is different. It is offset allowing more camber and castor.
  I tend to follow the Bilstein crowd for the E36. I have nothing against Koni. I have a set of sports on my Honda and I love them.
  • The Bilstein Sports(Left Part #: 35-044024, Right Part #: 35-044031) run on average at about $200 each. They are a direct bolt on to the 328i.
  • Bilstein also offers Sports for the M3(Left Part #: 35-105855, Right Part #
     35-105862
    These have the mounting tab for the End Link on the strut housing.
     Going price is around $250. 
  These will bolt to your 328 just fine. You can choose to run the M3 end link or keep the stock 328 ones. In terms of how this effects the performance of the car, I'm not sure. It depends on your driving style. The M3 was designed differently for a reason. I don't have much more than that really. 

   I dug in and began to check the forums, group sites, and internet for nicely used Bilstein Sport struts for an M3 or 328i. I searched for quite a while. I found some decent deals on some but, nothing really worth pulling the trigger for. I had some other stuff to keep me busy as well (see my stereo related posts) but, the suspension as whole was over do for a replacement. 

  That's when I stumbled upon a craigslist post for a set of used 96-99 M3 front struts and a set of H&R Sport Springs. Nice! The price was right as well. One problem, they were located in Pennsylvania. Not to worry, I have some good friends that live there. I called up my buddy Mike and asked him if he would be kind enough to take a look for me. He kindly obliged. He being a man of knowledge in car related things, I trusted his judgement on these. After a bit of schedule maneuvering he was able to meet up with the seller and make the deal. I was the happy owner of the lot. 

  Next up was to get them down here. I talked to our shipping guru, and friend Barry, at my work place. I'm able to ship stuff through work but, I wasn't sure if/how this would work. After a quick conversation, an address, and a form, I had a printed shipping label ready to go. Barry, you da man! I emailed that up to Mike and away we went.

  They arrived 3 days later. Freshly wrapped and well packed. They were looking pretty for sure. I was holding off on looking at strut mounts to see how these looked. The M3 strut mounts still attached, looked pretty good. I'm going to get the expert opinion from my buddy Jeremy before we proceed with the install. 

  All they needed was a little clean up and some paint. Then, they would be ready for install. More to come on that. 


2/20/2015

The Search for the Great Suspension - Control Arms, Lollipops - Part 1

  Many an evening has been spent pouring over the BMW related forums. Looking intently for that rightly priced front suspension components to replace poor Helena's tired front end.

What needs replacing:
-Both front struts
-Both strut mounts
-Ball joint on passenger side lower control arm.
-Both front lollipops.

  The front end on the E36 has lower control arms shaped like a "L" One end has the ball joint which connects to the spindle. The other slides in a round bushing. This is the lollipop. Named as such because it well, looks like a lollipop. In the middle of this control is another ball joint that is attached to the sub frame. 

For reference. The M3 has the longer blue end link for the sway. All other models use the shorter red one, that attaches to the lower control arm. Picture Reference Link.
  These particular areas wear quickly. BMW specifies a check of these areas in the inspection II process. Most sites/forums/people will tell you that E36 struts only last about 30-60k before needing to be replaced. Some of the ball joints are actually made of a plastic material. Over time they deform causing the tire to move during cornering and shimmy going straight. Tie rod ends have similar problems. Definitely not good things.

  My search for a quality replacement lower control arm lead me to Bimmerworld*. They had the best price, at that time, on the Meyle HD control arm. These have upgraded, hardened, full metal ball joints in them. Better able to handle the stresses of the front end. They also have lollipops and are willing, for a charge, to press the bushings in for you. Since I don't have a press at this time, that way was a no brainier. I don't want to go crazy with poly but, I wanted to give these a shot this time around.

  As a side note if you are running poly bushings in the lollipops, I hear you fall into a different class in the SCCA. I'm not an expert in the area so don't quote me. Since I will have a full spare set of lollipops I can get them ready for the next go around. It was a win win for me.

  Bimmerworld had a special going on as well. So I ended up scooping up a few other things. One of which included Z3/M3 front shock tower reinforcement plates. 

  The front towers can be a weak point for this chassis. The plates spread the forces exerted more evenly across the whole of the tower. I'm not really sure they are necessary for me, as I'm not planning on making the suspension super hard. This will be a daily driver, for at least now anyway. I figure the piece of mind up front was worth the pennies.


  -Front control arms with ball joints, check.
  -New lollipops with bushings, check.
  -Front strut reinforcement plates check.

* Here is the direct link for the suspension overhaul page: e36 Suspension Overhaul.
   Good info about all of this stuff here as well: e36m3blog. This blog post is very well put together, kuddos to the author.