5/02/2016

What's next? - New Project(s)

So what's next? That is where I left the last post. Time for a proper update.

With the hatch sold, I found myself in a predicament. For the first time I genuinely freaked out a little bit. I did not have a solid means of transport back and forth to work. Yes, I was more comfortable driving my 90 Civic Hatch than Helena. Why? That car had never let me down, it was easy and cheap to fix, and I knew all there was to know. Helena was different. I was confused, going broke, and sad.

It was time for a change, perhaps another Honda, just a little more refined. All the EKs have garbage interior and I didn't want that again. So, why not an Acura? Just a fancier Honda Civic really. The Introducing Leslie, my 2000 Acura Integra LS, 4 door. This will be my project moving forward.

I'm the fourth owner of this extremely well taken care of LS. With 145k on the clock and all the service done at the Honda dealership, there isn't much to do in terms of up keep on this little one.
 
 
My wife has been driving a 2000 Saturn SL1 since college. With 180k on the clock my comfort level with Sally has dwindled. Since I got a newer Honda it was time for her to upgrade as well. Introducing Penny, our 2011 Honda Fit Sport.
 
With 45k on the odo there is only a few things to look after on Penny. CarMax took care of all the basics so, I don't have to touch her for a bit either.
 
So back to Honda's for now. I still have love for the BMW's, this just isn't the best time to own one for us. I've moved over to a new blog: justanothercarguy.com. Check there for the latest Honda, and other vehicle updates.


4/06/2016

When one chapter ends. A tale, of the sale, of Helena.

I've been on the fence about my love affair with Helena since our December trip to the beach. Things finally culminated this past weekend that brought about an end to said affair.

Helena has been down for almost a month not because of time issues. I'm a busy person but, not that busy. The reality of the situation is that I've gotten to the point where this car stresses me out every time I start thinking about working on something. Since I am such a noob when it comes to all the different pieces of Helena I find myself overwhelmed rather quickly.

I have great local support, Jeremy, Brad and Zach at Parts European. They have all been more than willing to answer questions and help where they can. However, I just not having fun anymore. I never realized the stress of trying to learn a whole different way of thinking and engineering. If I'm going to be doing this, then, I better look in to this, ect. The thought of tearing off the head along made me cringe. Far beyond my comfort level.

The cost of ownership started adding up as well. That is not primarily the fault of the car. More the mileage and condition of the initial purchase. You can't skimp on cheap replacement parts for it either. BMW's are performance machines for a reason. Buying junk just leads to more issues. I'm not made of money either, so the toll this takes on the budget can have your spouse looking at you like your crazy.

Between both factors the decision became more clear. It is time to move on. We have had a good run Helena and I. I've made new friends, spent fun times, and not so fun times in the garage, and fixed all the problem areas I could. I've learned a ton about a different way to think about "performance maintenance." The key role properly designed, quality parts play as well. The real cost of ownership is different than what I expected, not bad, just different.

My mind has been wandering for some time. I'm the kind of person that sometimes takes too long to make a decision that I know I really need to. I had a conversation with Jeremy about different vehicle choices and, if he was interested in Helena. As he has spent the most time with me on her, he had first dibs. He did not but, his good friend Garrett had been looking for an E36 for some time. "May I send him your contact information?", was the question presented. It was just at the perfect time. Why Yes, yes you can.

Moments later a text from Garrett (Jeremy's buddy) about the car. He was living in Knoxville at the current. He was looking for an E36, I had one. Given Jeremy's friendship with Garrett, I would of course extend the same reasonable car sale price to him. After some questions, pictures, and money discussion, I was happy to agree to his terms. The last question, when could he pick it up? Saturday? By golly, says me, I've got to clean it, clear out my stuff, and make sure stuff is good to go.

Garrett and his wife arrived late Saturday afternoon. I tried to cover all my bases given he had just driven 4 hours to see her. After a good once over on the car, I felt good about the whole experience. He was very comfortable tearing apart the engine if needed due to the overheating. He didn't mind any of the nuances of BMW ownership. He was already a seasoned veteran there. There was no better person to sell this car to in my mind. I know he will appreciate her, take care of her, and best of all, enjoy driving her.

By far one the best handling, powerful, comfortable, and beautiful cars I've ever owned so far. She will not be forgotten. And who knows, maybe I'll be back in a beemer someday.

So hats off to Garrett and Helena. The names may change but, the spirit of the BMW inside will not.


So what's next for Slantysix.com? Well, Garrett has been added as a collaborator. It will be up to him as to whether or not he would like to continue blogging about this 328i or not now. I have no intention of bringing the site down either.

Is there a new project in your future? Yes, yes there is. I will reveal that in a later blog post.

3/28/2016

The Proper Coolant Refill Procedure

So after talking with my buddy Eric from PA, he educated me on ease of refill on the coolant in these E36s. As long as your coolant system is not leaking and your head gasket/head is in one piece you simply:

  Remove the bleeder screw.
  Put the aircon on low fan, heat max, 90 in this case.
  Fill the coolant overflow until coolant runs out of the overflow hole.
  Put your bleeder back in.
  Put your overflow cap on.
  Drive the car.
  Done!

Now of course because I am paranoid about this thing overheating I have to monitor the temperatures with my adapter as I'm driving. The temps fluctuate between 185 and 194. I left her sit for nearly 30 minutes at idle with the aux fan disconnected just to see if she tries to get hotter. The temp sat at 192 and never went any higher. Ambient temps outside at 75'F for us here as well. Not 100+ in the summer but, certainly enough to be comfortable.

If I would have known this prior I could have avoided all the down time. Oh well. It gave me a chance to think about the future of this car. So all is not lost.

Holding steady at 192F. I'd say we are good to go.

3/27/2016

Leak Down Test, Coolant Pressure Test

So, after my last post a month ago, with Torque and my OBD adapter, I've been monitoring the coolant temperature. I have not seen any coolant leak out of this car. What I have seen is a steady increase in temps as the car was driven after the initial fix. I knew something was up.

I bought a power bleeder to make life easier on me. Given this is the 4th time in a few months I've had to drain the coolant. What I found when I put vacuum on the coolant system was that it would slowly creep back down to 0 over the course of a few minutes. Something was wrong here. The tester is brand new and I don't have any other cars to test it on at this point.

My buddy Jeremy recommended that I get a leak down tester just to verify there are internal issues before I go digging the engine apart. This was a really good idea because it allows you to pressurize each cylinder and hear any leaks that may be present. It took a few efforts to figure out exactly what to listen for.

LEAK DOWN TEST

This Performance Tool leak down tester was about $70. It is self regulated at 15 psi regardless of the incoming pressure from the compressor. That is shown on the first gauge. The second gauge tells you how much of that is leaking from the cylinder. Whether by going around the rings, valves, or head gasket. These issues are manifested by hissing or gurgling from the exhaust, intake, coolant system, or dip stick orifice (he-he).

With my buddy Brandon's help, we began by spinning the engine and listening closely. You can tell when the valves are open or closed based on the noises made. When the piston is at top dead center and the valves are closed the gauge repeats at 20% loss. So that means that 20% (3 psi) of the 15 psi is escaping somewhere. Well with in tolerable limits. No cylinder seals 100%, there is always a little loss.


The intake valves were ope slightly with this picture. After we actually got her to TDC on this cylinder properly, we were at 20%. A-ok in my books. 
Air fitting, three brass fittings, an NPT pipe fitting, and a o-ring.

COOLANT PRESSURE TEST

So that all looks proper. What's next? To factor out the coolant bleeder no telling the truth, I made a custom fitting to put in to the coolant bleeder screw hole. This allowed me to pressurize the coolant system with the overflow cap on. A full test of the entire system.

Reduce the pressure on the outlet using the regulator knob.
I used the regulator built in to the compressor to turn the pressure down to 20 psi. This is about what the normal 140 BMW cap will run on the coolant system. Unlike the vacuum created by the power bleeder, pressure is easy to hear escaping than vacuum, at least in my mind. After pressurizing things it held steady at 20 psi. I opened the heater diverter using the air con controls, fan low settings, heat max (90). There was no audible hissing that I could hear coming from anywhere.

My custom made fitting. I used a dozen brake line fittings but, it works like a champ. Just have to be careful with the plastic threads in the overflow tank. Don't want to strip those. 
That is super exciting because that means that not only is the head gasket in working order, so is the coolant system. After more than a month of down time. now all Helena needs is to be filled up with coolant and driven again, hopefully! 

2/16/2016

Air filter change - 163K

So changing the stock air filter is seriously easy. The filter change interval is 15K. This is in the normal Inspection 1 maintenance routine.

Here is a link for a handy little track sheet: https://www.bavauto.com/Assets/inst_pages/e36mc.pdf

I chose a MANN filter. There are others available. I'm on the fence about aftermarket air filters given the increase surface area means little with the stock throttle body and manifold. Perhaps when I upgrade those, it might be worth considering. For now, a clean filter is better than a dirty one. 

There are two clips on either side of the air box. Press them in and pull up towards the hood.

Make note of which side of the filter is facing up.


Drop in your new filter.


Slide the tray back in. Snapping the clips in place.

Now enjoy driving with a fresh filter.

2/15/2016

Coolant System Woes - Part 3 - The Final Repair?


So here we are in the 1st week of February. I'm just finally getting back to working on Helena. She has been parked since we got back from the beach. I've been occupied assisting some others with a few automotive related repairs. It has been nice actually to take a little break. However, it is now time to get things moving again.


So I've started this process by draining the coolant from the radiator, yet again. I noticed this time around that there are a ton of aluminum shavings in it. The new radiator seems to have introduced a cacophony of little flakes. I'll have to flush the whole system once more before I'm comfy.

The coolant that came out.

I'm changing the overall layout of this post a bit from my normal ramblings. I feel like I've got several different postings all in one here but, I completed all of these at the same time. So this will just be one big long post about coolant stuff, belts, pulleys, and tensioners.

Tools needed:
32mm flat wrench.
Flat head screw driver or a 6mm socket driver.
T55
16mm socket
13mm socket

Lets Begin:
  • Loosen the fan clutch. 32mm flat wrench that is slim is needed. Sit the fan and fan clutch in the shroud.
  • Pop off the upper hose.
  • Take off the overflow tank's upper hose. The 3/8 one.
  • Pull out fan shroud and the mechanical fan together.

Fan shroud with overflow tank out. Laying atop the engine is a convenient place for it while working on the rest.
Now we have clear access to the front of the engine.
  • Remove the cover from the A/C tensioner. I used a small flat head to pop off the cover.
  • Use a T55 to loosen the hydraulic A/C belt tensioner.  ** I don't know if this is the preferred method but, it shows this in the Bentley manual.
  • Remove the A/C belt. If you are reusing, mark the direction so you can reinstall it the same way.
  • Use a 16mm to loosen the mechanical tensioner on the serpentine belt side of things.


  • Remove the serpentine belt. Again if reusing, mark your direction with an arrow.
Belts are easy and fairly inexpensive. If your changing your tensioner, change your belt. Service interval from BMW on these is 60,000 miles.

Tensioner Replacement
  • To get the tensioner out we need to remove the long bolt atop the alternator that holds the idler pulley. It is a 13mm.
  • There are two bolts holding the tensioner in, both 13mm. One up top, one on bottom. I used a shallow 13mm, 6 point socket with a short extension. They are easy to get at.
The original tensioner on this 98 328i is made by INA. When I spun the pulley is sounded really bad. This guy is done for. I'm quite happy I am replacing it. EuroPro also suggested that I get this taken care of, given I didn't know if it had ever been replaced.

  • Once you have the old one out. The new one goes back in just the same. Torque on the two 13mm bolts is 17ft/lbs.
Mechanical Fan Itself

I wasn't worried the fan because EuroPro just replaced it when we had the overheating issue down at the beach. However I wanted to inspect it before I put it back together. So, I'm looking at this fan clutch, a Sachs, nice piece. Made in Germany, quality brand, good stuff. However, the fan blades they used were made by URO. URO makes inexpensive products from recycled plastic in China. I'm not sure if they did this because they knew I had the OEM fan at home. Or if they were cutting their costs by using a $20 fan. Either way this garbage is not going back in.

Swapping the fan itself is easy. I already have the fan out so no further prep needed there.

Tools needed:
5mm Allen wrench/socket

Loosen the bolts.
Clean the mating surfaces if needed.
Put the new fan on the fan clutch.
Tighten bolts to:

Nice SACHS fan clutch.
This is what EuroPro put in.
Stock BMW fan going back in after I cleaned it up a bit.
Mounted and ready to install.
Reinstall the idler pulley

This is a good time to inspect the pulley while everything is apart. Mine sounded great and the pulley was in good shape. So, I decided to forge ahead.
The idler is on a cammed bolt. I'm not sure if this is to put a little extra tension on the belt or what. Nor am I sure the technique for mounting it so, I just put it on and tightened it.
17ft/lbs - this seemed little heavy to. I torqued it to 13ft/lbs. My bolt seemed to stretch the threads under higher torque loads.

Reinstall the belts


Serpentine goes on first.
Use the same 16mm to adjust the pulley so you can get the belt on.


The other picture in the Bentley shows the 4 cylinder however, the AC belt mounts in the same way.
AC Belt on second

Fan shroud order of reinstall: 
  • Put on the lower coolant hose.
  • Push the overflow tank into the shroud.
  • Tighten your lower hose on the overflow tank while the shroud is out.
  • Install shroud and mechanical fan together. Otherwise good luck getting it in afterwards.
  • Run the upper over flow tank hose before finalizing the shroud. I pushed the upper hose through the top of the shroud first and tightened my clamp on the over flow.
  • Mount shroud while the fan floats between the radiator and motor. There are three tabs of plastic on the shroud that slide in to brackets on the radiator.
  • Put the upper overflow tank hose on the smaller nipple and secure the clamp.
  • Put your upper radiator hose back on and secure your clamps.
  • Secure the fan clutch to the water pump.
  • Secure the shroud to the radiator.


Lower hose in place. So much room with out the mechanical fan in there.

Secure the lower rad hose.

Running the upper overflow hose through the fan shroud.


Securing the overflow tank hose. It is roughly 3/8 in diameter.

Reattached the upper overflow tank hose (other side of the pictured hose above) and the upper rad hose.

Looks like everything is in place now.

Now comes the very best part, bleeding the system. Let me complain here for a minute: this job sucks. Why BMW put there overflow tank in a location where coolant will fall right on the belts it recommends not getting coolant on, I will never know. European models have a different self bleeding setup. Perhaps I'll install that someday.
So here is what I did. The method I used for bleeding off the coolant system certainly worked better than running the car and bleeding the air bubble via the bleeder. That was a waste of time and gas.

My New Coolant Fill Method
  • Jack up the car as high as you can in the front. Make sure the car is stable, jack stands, a block behind the tire ect.
  • Stick a funnel in the overflow tank via the larger opening.
  • Put a rag or some card board, anything to help get the coolant that will overflow everywhere from splashing all over the belts and motor.
  • Take out the bleed screw entirely.
  • Now pour coolant into the funnel. Fill the tank up all the way.
  • Turn the key to the second position to allow the Air Con to come on. Set the heat to 90'. Put the fan at its lowest setting.
  • Now race back up to the front of the car and watch the coolant level in the over flow tank.
  • Keep filling it until the level stops decreasing.
  • Now, since the coolant has made its way inside the heater core correctly, we need to get the bubbles out of the rest of the system.
  • Continue overfilling the tank as air bubbles escape from the bleeder hole.
Side note: After I stopped seeing bubbles I blew in to the coolant overflow tank via the cap opening. This got a few more bubbles out and set the level in the overflow tank. While holding pressure in the overflow tank with my mouth I secured the bleed screw. If I didn't it would suck air back in via the bleeder opening. I'm pretty sure this is not the preferred way to do it but, from a shade tree mechanic's perspective, it will get the job done.
  • Once you have a steady stream of coolant and no more air bubbles coming from the bleed hole, you are good to place your bleeder screw back in.
  • Take the car for a trip around the block. Let the temp get up until the thermostat opens.
  • Now park the car.
  • Let is cool all the way down. If you do not then, air bubbles can be reintroduced to the system.
  • After it is completely cold. Open the overflow tank and look at the level. If it is too high take some coolant out. If it is too low, add some coolant to the KALT line on the overflow.
  • Keep an eye on your temps over the course of the next few days. Check the overflow when cold regularly. Once you see coolant levels consistently staying put, you have heat in the cabin, and no drips, you should be good to go.

So after much a do, that car is back in action. Other than a dead battery, everything seems to be in working order. The car is holding steady at 204' F. The aux fan is working properly. No super swollen hoses or overheats at this point. The only component on the system that has not been changed at this point is the hose that goes from the overflow tank to the heater core. That one looked like it was in good shape so, I left it. I think I will order a replacement for it in the near future but, before I bring the coolant system down again I have some other areas to address. 

2/10/2016

Finishing the Power Steering Issue Proper


If you missed the earlier post in regards to my band aid fix for the power steering return line, it can be found here: Leaking Power Steering Hoes!

While I'm still working on the rest of the coolant system I took the time to swap power steering pulleys. The original unit is a composite plastic. I went ahead and swapped it for an aluminum unit from ECS Tuning. Nice quality, decent construction. No complaints here.

I already had the belts off since I was changing them already. My outline below does not go in to detail in regards to removing the belts. I'll have more details on that process in an upcoming post.

Tools:
Socket Wrench
13mm socket

Removal:
Three 13mm bolts hold it on.

Removing them can be a challenge. I didn't really find a better way other than to just hold the pulley and loosen them.

The old pulley came off easy. Just shimmy it off.

Installation:
Slide on your new one. Torque the three 13mm bolts to 22nm (7ft/lbs). Easier to tighten them with the belt in place.

New belt and pulley in place.


While I was down there, I swapped the old makeshift hose for an authentic BMW replacement. Also drained some more nasty fluid out. When I filled it back up there is still some old fluid in there but, it is mostly red again instead of black.

I went ahead and put nice OEM clamps on both ends of this guy as well. Power steering fluid is number 1 on my list of disliked fluids. It smells nasty and soaks in your skin. I have a feeling this should be good for a while. I'm thankful to have this one done.


New power steering return hose.

2/07/2016

Lipped up - Ikon Motorsports front lip

I found a lip on Ebay. I had my eye on it for some time and it went on sale. I couldn't help but snap it up. I knew it was going to get banged up with the H&Rs sitting Helena lower so, I didn't want to spend good money on something real nice. This is still a daily driver at this point.

I spent the $50 on this thing fully knowing it would probably not fit worth a crap. I got the heat gun, torch, drills, pop sickle sticks, ect. When I actually went to install it I was surprised that albeit deformed a bit, actually fit better than expected. Regardless I played with this thing for almost 4 hours.

I used some 3M Double sided tap at first. I knew this wouldn't be a forever installation. However the poly this is made out of was oily. I tried to clean it off the surfaces but, the tape wasn't having any of it. I ended up using the supplied screws to attach this thing. After much deliberation I was able to get it situated with a little trimming of the lip's underside, and just a few screws. The passenger side is still not perfect but, I was done messing with it at this point.

Night shot.

There she is. Between the lip, the headlights, and the grills, the front end of Helena is looking sexier than ever. I could literally look at this thing all day.

2/06/2016

E36 DJ Auto Glass Elipsoid Headlight Installation

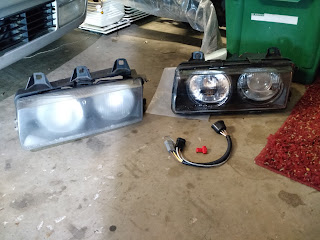
Thanks to the guys over at Parts European, I was able to source some almost new glass headlights for a reasonable price. They looked almost new but, they had some grot on them. They also had some obviously aftermarket halos in them. The video below explains why they needed to come apart.

Time for some disassembly.

This is far from cool.

The front sections separates from the back. Remove the clips on top and bottom. Then gently separate the plastic tabs on the left and right.
 
The previous owner had taped these to the glass with scotch tape. What a great idea right?

I took out each glass piece, cleaned the inside of the front glass then, reassembled. Clear silicone is white at first. Harder to notice than the black that was gooped all over these.

Back together fresh and clean.
 
The chrome needed a little touch up. Nothing a silver sharpie can't fix.

You can hardly even tell there was chrome lifting now.

The wires that came with were just pushed on the terminals with no cover whatsoever. These DJ Auto's will except the Euro lighting plug. As it would turn out that plug is also the same the OBD2 mass airflow sensor plug. An OBD1 plug will not work. So if you happen to have access to 2 96+ MAF connectors you are in business. Otherwise Pelican Parts sells a Euro lighting harness kit for about $70.
 
Stock lights vs the DJ Autos.
 
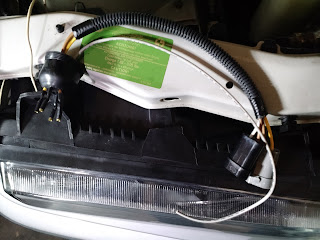
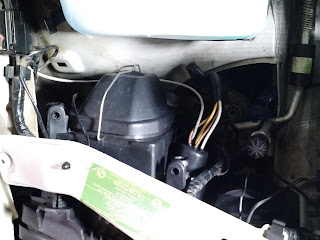
I went with a set of Ebay special wiring adapters. This kit allow you to retain the stock lighting harnesses and has a rubber cover the grabs on to the housing. No more exposed wires.

 
This is the connect. The yellow wires is closest to the hood.
 
Prepped, cleaned, and ready for install. Remember these lights only require two adjusters on the top row, not three.

Installed top view.
 
Installed front view. These come with Euro city lights and allow use of the H1 style bulb across all the lights. So now the fogs and all headlights are H1.

All back together.

The city lights are my favorite part. I've never been a fan of the halos on the E36 since I saw the M3 European lights. They have similar city lights in those.

With these and the black kidneys, the whole car is freshened up. Now just to remove that license plate holder.