6/26/2015

Distracted by the aftermarket - E36 Factory Lowe Amp Open Case

Thanks to Brad at Parts European for donating two amps for tear down.

  *My Original intent with this post was to dissect the inner workings of the stock amp and, gain better sound quality from it. Read below for more details. After some work, reading, thought, and ultimately time needed in other areas, this post stands as a what if. Nothing more.

  I've been distracted by the after market. Given the low cost of small amps pulled me over to their side. I'll have more up and coming on that in future posts. I'm still prototyping mounting locations. This is my rough draft if you will so far:


  Original Post:

  I'd like to discover whats inside these guys and how/if I can get the rear channels before they are crossed over. In our quest for stereo goodness I need a full range signal to the rear coaxial pioneers in our setup. I'm jumping head long in to territory I know nothing about at all. I'm not an Electrical Engineer by any means. Given enough time and reading material one can be good at just about anything.

  My thought is this: We only need about 25watts RMS to the speakers to get reasonable sound levels. If I can somehow get this from the stock amp or, stock amp parts, I don't have to fool around with mounting an aftermarket amp. Clipping harnesses, is really not an issue as you can get the pins from your current amp and make a harness for your after market amp fairly easily.

  I've browsed many a forum, never posted. I've read a lot about how amps work. I've so far been able to identify what amplifies the sound however, I've got no idea where it goes from there.

We are peering into a Loewe, Low amp. 


Those little flat raised silver pieces are what do the amplifying. They are called transistors. Cool stuff.

  I know from many a wire diagram and, tracing out the wires, where the four channels come into the amp, from the radio. From there the signal goes through a series of resistors and capacitors. There appear to be several similarity configured items on this board. More noticeable from the bottom.

  To get to the signals internally I need to understand which paths come into the transistors from the head unit and which leads they are output through. I reached out to Loewe to inquire about a wiring diagram for these circuits. Of course they were not able to furnish such because of private/proprietary knowledge or copyrights. I assumed that this would be the case. I mean why wouldn't it be. When a company puts time into making and designing something you can't just give out such knowledge to some random e-mailer. 

  This case will be up to me to crack. I've begun doing some more research into how transistors work in general. If I can find another similarly designed transistor perhaps I will have success in finding the output signals I need. This might just be a pipe dream, given my limited time, however, it is certainly an interesting prospect.

6/25/2015

Finally finishing ASC delete with 10ohm resistor

  
  I finally got around to putting my resistor across the ASC to remove the lights on the dash.


  I twisted the ends of the resistor wire and gently pushed them into either end of the 2 wire ASC plug. The stock connector was so brittle it broke instantly. I was trying to properly de-pin it. I was going to use heat shrink properly however, I decided to "test" it with e-tape first. I'd hate to get everything shrunk down just to see there was some issue.


  With everything taped up, viola', no dash lights. Works like a dream. Easy to do, and cheap too.

  So the question is why didn't you get a silicone elbow. I'll answer that with a question: why do I need it? I mean for the $25 it costs to get a new BMW non-ASC boot and hose, I delete the ASC with stock pieces. Or for $80 you can get a silicone one that lasts forever, resists heat, and is supposedly better. Anyone see any measurable gains with the silicone one on a stock M52 intake manifold? Doubtful. I don't have that kind of cash flow to drop on something that "might" improve my airflow slightly anyway.

6/22/2015

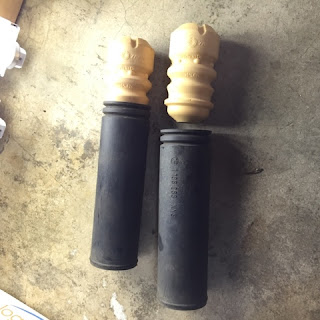
Finishing up the rear end - Bump stops, covers, and reinforcement plates

  Fathers Day wouldn't be Father's Day without some  car workings. Finally taking the time to put the bump stops and shock piston covers back on the rear shocks.

Pretty straight forward.
Remove rear shocks.
 
Take off shock mount.
Snap bump stops into the covers.
Slide on the shaft till it stops.

Reassemble.


  Its not like tons of debris make their way up on that shock piston but, it is nice to have the cover since that is the way it was designed to be. Makes way more sense seeing them together than when the covers were just floating on the shock body. There were no more bumps stops left on the old shocks. Poor thing had bounced them to nothing.

  I was able to add the shock mount reinforcements as well. Not that I really need them for daily duties but, peace of mind for later down the road.
 

6/11/2015

Fresher rear badge for Helena - Differences between e36 and e46 rear badges

  When removing the rear badge off your hot whip be careful using any metal object. If your an impatient goober like myself then, you will scratch your paint. Not that anyone else can see it after the new roundel is on but, you know its there.

  A good set of plastic/poly interior removal tools proves very valuable here. Most of the issues I've heard and seen with badges are from the plastic grommets on the trunk side cracking. This makes for an insecure fit on the new roundel. 

Differences between E46 badges and E36 badges  

  BMW stock part number on e36 front/rear badge: 8 132 375 
  Size Front and Rear: 82mm

  Part number on e46 badge: 
  Front: 8 132 375   Size Front: 82mm
  Rear:  8 219 337   Size Rear: 73mm

  Applies to the rear roundel only: As you can see the e46 badge (on right) is slightly smaller.
  
Removing the rear badge

 What worked for me. I started using a plastic spatula to get mine off the rear. However, the edge wasn't slim enough to get under it. I then, used a small screw driver that I wrapped in a paper towel. Not a smart Idea. I might as well have just used the screw driver. 

One I got it started by applying light pressure to the left and right sides of the roundel. When it started to lift,  I rocked it gently going from one side to the other. It then, started to shimmy itself out properly. Don't be too rough on it or you will crack those grommets. Once off, clean up the filth under it. Check your grommets, replace as necessary. Then, pop on your new roundel and enjoy.


6/01/2015

Contemplations - The mind of a car guy

  I left for work earlier than usual this morning, to take the long way in to work. I miss taking the back roads in to work. I don’t have many quality roads on the way in to where I work but, I find the joy and anticipation of those few choice corners to be my exhilaration for the day. In retrospect it is pretty sad that my most enjoyable moments are the ones spent in my car driving, alone, with the music on. I need more bass down low though a, work in progress.

  Helena feels so much better. She is fun to drive. When I push it just a bit I can hear the tires start to loose traction. I can feel the back end start to shimmy ever so slightly. My mind is just begging to get a little more foot in it. Let’s see what this thing can do. However, the realization that I’m on a public road, with a low speed limit, makes me calm down.

   I really need to get her out on the track where I can push and see what happens. My biggest fear is just overcoming the initial newness of this car, the nervousness of trying something new, and the time spent away from the girls. It’s not exactly something my whole family can get in to. Deep inside the need grows to just go have fun with this thing. I can understand how folks get in to Motorsports so deep. There is this yearning to just push the machine as much as you possibly can then, fix what’s left if it goes wrong.

  Not that I’m some kind of expert in these things, however, there seems to be quite the difference in how cars are setup for different Motorsport genres. I mean a drift car can race on a track. Will it be faster than a track specific setup? I guess it all depends on the vehicles involved. In my mind a car made specifically for track racing, is not intended to be a drift machine. Same goes for cone courses, mountain climbs, or drag racing. I’m sure that there is bleed over; however, F1 cars don’t run in the WEC for a reason. Two separately designed vehicles entirely.

  This is not to say that you can’t build a car that does all of these things. I’m really just generalizing here. The real question on my mind is: Can a family car, driven daily on the street, perform well on the track? I’m not sure where I stand on that at this moment as I have no experience in the matter. Where is the line between a family vehicle and a hard, bouncy, rocket machine?


  I’ve never been able to keep up with two separate vehicle projects at once anyway so, I’ll just keep going with Helena and see what happens. The whole reason I bought this car was to get a vehicle with four doors to carry the NiƱo’s. Now my mind is contemplating how close to a smoky, drift machine I can get this thing; with flappy, smoke stack exhausts of course. Chyeah!