12/22/2015

Leaky Power Steering Hoes!

I've been seeing a few drops of something on the garage floor recently. I thought it was oil but, it had a funky smell. The other day Helena made a groan while turning sharply out of a parking lot. It sounded a lot like the noise a car makes when it is low on power steering fluid.

Upon inspection that indeed was the case. The reservoir was quite low. I jacked her up to see what the hoses looked like. Of course everything was soaked in fluid. Someone had been here before. There was a non stock hose clamp on the pump end of the return line. It was dug into the hose pretty pretty good. I did what I could but there was no saving the poor guy.


Once I finally got the hose off the pump and out of the reservoir, I saw that there was a part number and a date stamp. This hose had been on here since 98! Like, when the car was made. At 160K I'd say it did fairly well. The ends were cracked, hard, and leaking. Obviously it had leaked before given the non OEM hose clamp. That was a band aid.


BMW put crimp on style clamps in this area. There is no removal and reuse on those guys. The reason I like OEM clamps is because they do not dig into the hose like the perforated after market ones do. They are all smooth, which, I have realized is a really nice thing.

The two big name local auto part shops didn't have a hose in stock. Given I'd be waiting 2-3 days I improvised. I used 19/32 PCV hose to get me by. This will give me time the get past the holiday travel then, I'll order the proper parts.

I took out the reservoir and cleaned it up, inside and out. 

Since I was under here anyway I went ahead and took of the feed line as well. It was also a bit leaky but, the hose wasn't toast. It had the stock crimp clamp on it. I noticed that this line had a second crimp clamp lower down. I thought it odd but, figured it was there for a reason. It was, there is a small metal delimiter (if you will) in there. All I can figure is that this is used to hold pressure in the rest of the line and, keep fluid from blasting up into the reservoir.


From the last coolant go around I had two stock BMW clamps left over. This fit the almost 1/2 return hose nicely. I did have to use a perforated clamp on the feed line. I clamped it lightly as to avoid digging in. I'll have to get back to this guy soon with an OEM clamp. Else it may end up in the same boat as the return line did. Although, it wouldn't be a bad idea to purchase a new one. We will see.


12/21/2015

Sunroof Motor Cover Replacement

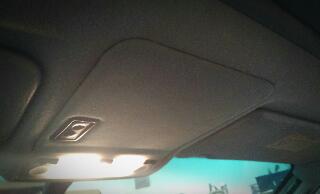
The fam and I are highway tripping it to see the folks one fine November day when I noticed an odd noise. I couldn't quite make out where it was coming from at first then, I realized it was coming from the sun roof cover.

I held in place for a minute then my wife messed with it for a moment. She said, leave it go, its fine. I tried to leave it but,  rattles that don't come from the stereo are not welcome in my car. They tend to try me crazy.

So like all times when I didn't listen to my significant other, bad things happened. I kept messing with the cover. I figured if I could just push it enough to stop rattling. Well a few miles later and, a bump over a bridge, it was dangling from the sunroof switch wiring. It about scared the life out of me when it fell.

It turned out that all but 2 of the clips were broken. Whatever was making the noise wasn't anymore but, I certainly couldn't leave the thing dangling there. We tried putting it back but it fell again so, we unplugged the sunroof switch and placed  the broken cover safely away.


When I put my water pump order in I went ahead and picked up a new cover as well. ECS tuning was one of the few, of the few I looked at, that had this piece. Less than $20 for a new, BMW, cover.

BMW Part number: 51448173537
Site link: https://www.ecstuning.com/BMW-E36-328i-M52_2.8L/ES115695/


The only downside for me since the cover is  new, it has a plushier foam backing, and is a clean shade of grey. My old headliner does not have the same backing and is not the same shade. This is no fault on the new part at all. Looks like I'll need to update my headliner soon to.
Installed! I even put the button in the correct orientation the first time. Can you even believe it?!


11/25/2015

Coolant System Overhaul Preparations

Helena tried to over heat the other day while stuck in a drive-thru. I'm sitting there one minute, I'm looking at the needle rise the next. As it would seem when I opened up the heat, the system was improperly bleed. This lead to a big ole air pocket getting stuck in the system. These models are exceptionally effected by having air in the system.

Upon further research I discovered that the system is pressurized up to 2 bar (29PSI). The Bahr overflow tanks can explode under such pressures. Albeit rare, sometimes they do. I'm wondering if there is a benefit to such pressure. The higher the pressure the higher the temp of the coolant before it starts to boil. Most vehicles run between 15 and 18 PSI. There is one company German Auto Solutions, providing overflow tank caps that put the system at 1.2 bar (17psi). BMW seems to have understood this as well. Newer models come with a lower pressure rating now. I'm interested in this. More later.

Helena has a mechanical fan fan clutch. These can also fail over time. Sometimes they stop spinning altogether. Other times they lock up and do not variate with engine speed. This leads to the fan exploding. Note: This statement may be a myth. Per better sources: Most people do not replace their serpentine belt tensioner and the belt lets loose, that then in turn causes the fan to fail. I've also heard of cheap replacement fans throwing their blades at higher RPMs.

When the fan fails the radiator, overflow tank, hoses, pulleys, belts, and thermostat can be adversely affected by flying pieces of broken components. The pulleys are also made of plastic. The radiator fan is, of course, made of plastic as well. There are euro counter parts available that have a plastic ring surrounding the blades. This helps with this issue. Giving the blades a bit more rigidity. If this fan was to explode it would cost quite a bit more than the stock fan and clutch, that's for sure.

She also has an auxiliary fan mounted in front of the radiator. This is operated by a aux fan switch that should come on when the coolant reaches 91°-99° C. This fan also comes on and off when the A/C is running. So in essence the radiator has a fan that pushes air from the front (aux fan) and pulls air from behind (mechanical fan).

I was told when I bought it that some work had been done to the coolant system. No paper records but, there is an aluminum thermostat housing on this car. That means it had been replaced from the plastic composite one that would be there normally. It has 05/15 etched in to it. The hoses appear to be newer as well. I'm guessing they were changed at the same time. Or at least not swollen and nasty. 

This is good and bad because I have no idea about any of the other pieces in the system. Has the water pump been changed? How old is everything else? This 328 has 160K on the clock. Just a matter of time before stuff goes wrong if I don't do some preventive maintenance.

Which is what has lead me to where I am now. For my piece of mind, I need to know that the coolant system is in good order. So, off to the parts websites to order what I think I need.

Here is the lot of stuff I got:


- Coolant Overflow Tank (BMW)
- Coolant Level Sensor (FEBI)
- Upper Radiator Hose (GATES)
- 92`C Thermostat (BEHR)
- Water Pump (GRAF)
- Water Pump Pulley (ECS)
- Water Pump Nut (BMW)
- 80/88 Aux fan Switch (URO)

What I already had

- Aluminum Thermostat Housing
- Fan Clutch
- Fan
- Belt
- Lower Hose looked good.
- Overflow to Heater core hose looked good.
- Upper Overflow hose looked good.
- Radiator looks like it has been replaced as well.


  The folks who did the coolant system changes before didn't do half bad a job. This car has obviously had green coolant run in it for quite some time. my overflow looks like a ninja turtle.


  The original issue of overheating was taken care of by bleeding off the system properly. Which thanks to my friend Jeremy, is made a lot easier by jacking up the front of the car. Following the standard BMW coolant change procedure, when jacked up in such a fashion, the air bubbles rise up front faster and easier. Nice!

  Well if the car isn't overheating anymore why buy stuff? While working out the overheating and checking the other components of the system, I discovered that the fan came in contact with the upper radiator hose at some time. There was a small divot taken out of the hose down to the braiding. This made me nervous. If I am going to take the hose off then, I might as well replace some of the other components as well. 

  Again, I need piece of mind in regards to the age of the components. Preventive maintenance, mixed with a little performance maintenance. More to come on that.

11/11/2015

E36 Visor Clips Disintegrating - A small yet annoying tid bit

  My stock visor clips have latterly started to crumble apart. Little pieces or plastic seem to chip away every time I open and close it. A buddy of mine has a smoker's E36 as well, his did this same thing. Could just be age but, I think the smoke has something to do with it as well.

  I headed over to PartsEuropean to chat and hang for a bit. I asked if that had a set. Indeed they did. These came of a 96 E36 coupe. They are a slightly different style but seem much more sturdy. They are also not crumbling to pieces.

Disintegration!

To access the screws, take a flat head screwdriver, insert into the indentation of the cover flap, push away from the center. I'm surprised these didn't fall off when I did this.

Once the two screws come out, there is a wire connector. It is just a push on spade connector. This is what allow the light above the visor to come on when the slider is pushed over on the visor. Just remember not to pick your nose in the mirror at night.

The coupe visor clips are a bit different. Notice they have exposed screws. The area around where the visor is held is also a bit thicker than the ones that came on this car.
 
 
  It looks as though on RealOEM.com, after cross referencing, shows that these are the older style. These have been superseded by the ones with the covers. Part #51168219048. Not an expensive fix by any means but, it certainly is nice to have a visor that doesn't drop flakes of plastic on you every time you touch it. On to the next one now.

10/27/2015

Leather Seat Conditioning - Chemical Guys Leather Conditioner w/Scent

 
  The front seats in Helena are pretty well worn. The driver side is terrible. At this point I believe the only thing to do for it is have it reupholstered or, keep my eyes open for better taken care of seats out of another vehicle. Either way, I need to massage these guys in a regular interval to avoid them drying out and getting worse.

  There are half a dozen different options on the market. The Chemical Guys variation of leather cleaner and conditioner is my first one to try The cleaner seems to work well. I'm not sure what is in it, as the ingredients are not listed. It did seem to clean up the soot from the cigarettes that were smoked in this car once upon a time. Got some grime and general dirt of the back seat from my little one climbing in and out. I think it does a decent job.

  The conditioner certainly does soften the leather. It leaves a visible shine but, is not overly shiny. It leaves a nice polish on the leather if you will. The down side for me is that this stuff is leather scented. It does a good job of smelling like leather but, it is much too strong for my sensitive nose. If I do all the seats in the car, I have to leave the windows open to air out the smell. They do have an unscented version as well. Other than that, I have nothing to complain about for this product. I think it works well but, my knowledge of other leather conditioners is not good. I'd like to try another product once I use up what I have of this. I'll add a comparison of that later down the road.

I've got a few photos of before and after. I think it is hard to tell the difference personally. It is one of those, have to be there in person kind of things. This is not working any miracles on the old leather by any means but, it certainly does soften them and, leaves a nice sheen.

Before - rather dull

After - there is that bit of shine


E36 Intermittent Starter Issue - Starter Motor Research

My Starter has started to intermittently stopped functioning. What I mean by that is when I turn the key to start the car sometimes the starter will begin to engage then, just stop. The engine hasn't had enough time to turn over, in turns it doesn't start. Time to plan a replacement procedure.

Most of the auto parts stores have a China made replacement for around $125 without core charge. Advanced Auto actually has a Bosch for a good bit more. However, they are also running a 20% off special, for online orders only, and free shipping. This brings the price down to non discounted China made starter levels. I personally prefer the Bosch starter simply for the fact that I do not want to make it a habit of taking off the manifold and replacing my starter, period. The parts probably all come from the same place these days anyway but, peace of mind knowing it is a genuine Bosch piece.


I've also been looking at the difference in the starters themselves. It would seem that the original factory starter on early e36 models (per 96) had weaker mounting ears, a bracket that affixes them to the engine, and non threaded holes. All of these things from what I can tell make changing the starter a real pain. Here is a picture of such: http://s82.photobucket.com/user/Dispatch20/media/starter.jpg.html
 
I found a great video online showing what a disassembled starter looks like as well: https://www.youtube.com/watch?v=PdNQuPS0U6w
 
I've yet to tear in to anything. I'm simply researching what I'll looking at getting in to. More to come on this subject, most certainly.

10/23/2015

2nd Oil Change - 161353


  Poor Helena has been overdue for an oil change. The last one was at 154xxx. I ran the Castrol GTX Full Synthetic 10w-40 through out summer. This time around I chose to go with a Mobile 1 Full Synthetic 5w-40 Turbo Diesel oil. Broader range with a lighter weight down low for the winter. I'm slightly concerned that the thin oil might do a bit more leaking on Helena's old seals. We will see. The manual also shows me that 15-40 is good down to 14`. I'm not thinking that we will be seeing those temps down here in the South. Its all a learning experience.

Factory manual recommends "Special - Oils" mmm hmm, yeees.

  I followed this Pelican Article loosely. I was confused by the two drain plugs it was telling me to look for. There is definitely only one drain plug on this pan.

So the change is an easy one.
  • Jack the car up.
  • Put her on stands.
  • Use a 17mm socket. Take the pan bolt out.
  • Let the oil drain. Make sure your pan is big enough to support more than 6 quarts, up to 7 quarts of  drainage.
  • Remove the oil filter cap. I used an adjustable wrench. I'm not happy about that though, it ate the plastic up a bit. I'd rather use a socket but, I don't have a 36mm.
  • Take out the oil filter, clean the inside of the filter housing.
  • Drop in the new filter.
  • Put the oil filter housing cap back on. Don't forget to put on the new seal. Do not over tighten this guy. They get stuck on easily.
  • Put 17mm plug back in the pan. 25Nm on the torque. Aka 18lbs/ft.
  • Take the car off the stands.
  • Fill her up with fresh oil. The 2.8 (M52B28) in mine took 6.5 quarts. Remember to check the stick again before you put everything away.
  • Just check your dipstick. Don't overfill.
  That's all there is to it.

  Then I took a few minutes to give the bay a once over. Got everything all shined up and clean. Nice to give her a once over after the hiatus.


9/29/2015

Hot Glue on my AirCon Controls - E36 AirCon Seperation

  The face of my air conditioning controls has been separating itself from the rest of the unit. I hear it's pretty common. I did not want to spend another $100 so I hot glued in the spots where the face was separating. There are four small screws that appear to hold the face in place. They of course were all broken.

Hot glue the four corners.


Hot glue the bottom.


The face is not lifting anymore, for now. We will see how this does long term.

7/18/15 - Still no lifting. Feels just as solid as new.
8/10/15 - Still no lifting. Good and solid still.
9/29/15 - Still no issues.
2/04/16 - Update - All good.

8/10/2015

Front Brake "Upgrade" Part 2 - E46 Brakes - Installation

Installation

Tools needed:
  • 6mm Allen
  • 7mm Allen
  • 17mm socket
  • 16mm socket
  • Short extension
  • Socket wrench of choice
  • Breaker Bar/Impact Gun
  • Lube
  • Brake Cleaner
  • Large Screw Driver
  • Hammer
Optional
  • Bolt loosening spray


Obviously we are going to jack the car up. Please be safe, make sure the car with not roll while being jacked up. Use a jack stand. You know the normal precautions. Remove the front wheel(s).


   There are two 16mm bolts holding the caliper in place. In this picture, on the drivers side, see that black wire? That is the wear sensor. These are on one side only in this case the driver's side. What these do is: when the material on your brake pads gets worn away, eventually these come in contact with the rotor. When that happens you will see a light on your dash informing you of such. So you may need a new pad wear sensor if this has already happened.
  You could also upgrade your brake pads, rotors, or lines. That is entirely up to you. Swapping rotors or pads is an easy go. Getting into lines, or calipers involves brake bleeding. Every car guys favorite activity of course. One word, quality power bleeder. Made life better for me. 
  Given the caliper is sitting out further I was worried about the wear sensor wire being too short. This was not the case. Getting the wear sensor off, whilst holding the caliper in hand, can be a little tricky. Patience and a strong arm is key.
Stock E36 Rotor, Bracket, and Caliper.
E46 Rotor, Bracket, and E36 Caliper Installed.


  Installed. Wait, I thought you said you had painted the caliper as well? Yes, I did, however, someone is borrowing my compressor and I did not have the time, nor the assistance to foot bleed them. For now I'm running the non painted calipers, with the painted brackets.


  Sits just fine with the stock 16" Sport Wheels. So how does it feel? Good. I scuffed off most of the rust on that rotor. The pads will eat off what's left. The rotors are straight, no wobble. This whole effort was to see what the difference was between these two sets of rotors, calipers, and brackets. I wanted to work out what was interchangeable. The budget here was very low, obviously, however, the results are tangible.

  BMW designed the braking system well in the E36 and E46. For me, if I can get parts in a newer design, that a little better, for just a few more dollars, I'll give it a shot. In this case this whole project cost me about $35, not including my time. Easily more for after market rotors, pads, ect but, now I can look into those avenues knowing that it will all work even better.

8/07/2015

Front Brake "Upgrade" Part 1 - E46 Brakes - Paint, Specs

  I got these awesome, super stock calipers off a wrecked up 01 325i. Already painted red for me. Extra performance right out of the bag folks!


Specs

Rotors
  Why would you try putting these on an E36? I'll tell you. The E46(99-05) 325 & 328 have 11.8 inch rotors up front. The stock e36 rotors on my car are 11.2. I'm gaining about a .6 inches. Not much but, it is an improvement in rotor circumference.

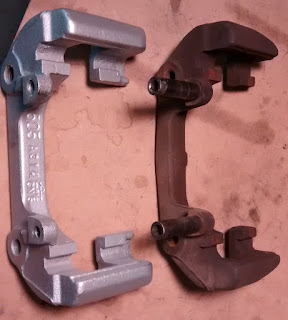
  The calipers are identical, the pads the same, it's the carrier bracket that differs. These will increase my radial braking surface resulting in a whopping 6% braking increase over the front axel! Can you even believe it? A laugh and giggle there for sure, obviously. However, all be it a small increase upgrading to E46 rotors and calipers all around, with stock pads, will accumulate around a 13% increase total which, is something.

11.8 inches on the E46 325, 328 rotors
Calipers
  I was curious about the sizing of the piston diameter on my stock E36 calipers versus the stock E46 calipers. Some pictures for confirming sizes of the piston diameter below.
  • The serial numbers on the calipers differed slightly. 
  • The weight was about the same. 
  • The piston diameter was also the same.
2.085 outer roughly.
1.565 inner roughly.
.250 (1.4) thickness.
Bracket  
The bracket was certainly different. It moves the caliper out further from the spindle to accomdate the larger rotor. The slide pins are in the exact same location allowing for use of an E36(325, 328) or E46(325, 328) caliper.
Caliper brackets side by side. Its hard to see the spacing of the threaded holes at this angle. Sorry. They are just a bit more than a 1/2 inch different.
 Prep and Paint

  Of course before I put these on my ride Id like to make them, not red. A good spray down with brake cleaner. Some medium grit(220) sandpaper to get started. I used the rotary tool to get in the tight spaces. This creates a good bit of dust, please be cautious and wear a face mask here. If I had a media blast cabinet, that would have made this a dream. Its on my list.


Tools of the trade for prep
  • Heavy wire brush
  • Large pliers
  • Rotary Tool with a metal brush on it
  • 120 Grit Sandpaper
  • 220 Grit Sandpaper
  • Brake Cleaner
  • Not sure what I was doing with the wheel cleaner there

  After sanding and a rinse. They are ready for paint. I'd advise removing the carrier pins. This can be done with a 7mm Allen wrench or socket.


  They look so good after a good spray. Unfortunately as with most spray paint techniques, these may not hold their color forever. We will see. A lot of people really have great success with powder coating however, the cost is substantially more. I do not have that kind of cash flow for this project.